Static Ignition Timing on VW A1 and A2 DigiFant Engines.Test conditions: Distributor cap off of the distributor body, business end of the coil wire where it cannot shock you, we WILL be making the coil spark. DVOM or TWO COLOR LED test light connected to the green/white Hall signal wire at the base of the distributor. Engine at (or very near) TDC #1. On manual trans cars you'll be wanting the bell housing plug removed to see the flywheel timing marks. Ignition key switch on. Some means of slowly rotating the engine by hand such as properly tightened v-belts and a socket on the alternator shaft nut or a screwdriver in the alternator fan blades. I prefer 5th gear, car on a level surface with brakes off, roll the car back and forth. After EVERY adjustment and after most checks, rotate the engine backwards (counter clockwise as viewed from the right {passenger} side of the car, UK, Down Under and Japan guys, figure it out already, right and left are as viewed from the driver's seat) about 1/8th of a turn or so, then come back to the marks clockwise so as to take up belt and gear slack same like when the engine is running. --- 1st, CHECK where the timing currently is set. Back the crank up as described ^^, slowly rotate the engine just until the Hall signal goes HIGH, about 10 volts, look at the flywheel marks, that's where it is timed. Maybe you are done already, hey? Rotor is in this position........ [img]http://reflectionsandshadows.com/cabby/static-tdc-high.jpg[/img] 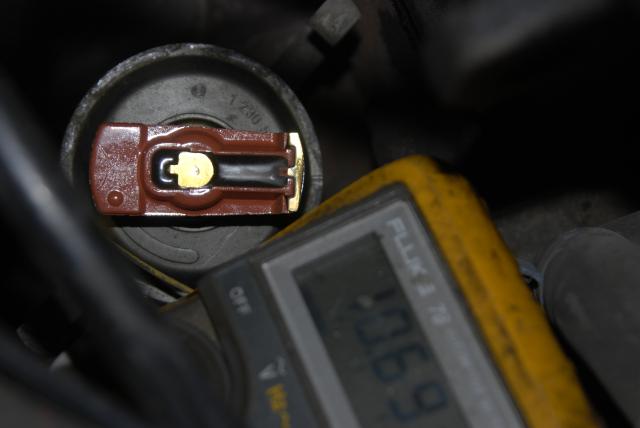 Shutter wheel is in this position, aperture has just closed the Hall 'window', but you normally don't need to look at this and would probably rather not considering the pita rotor removal can be on these engines. [img]http://reflectionsandshadows.com/cabby/shutter-wheel-at-1.jpg[/img] 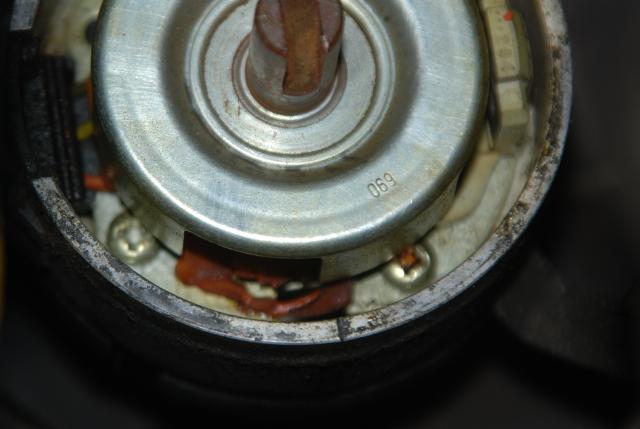 --- If adjustment is required, back up the crank, then come forward until the +6° flywheel mark lines up with the bell housing pointer. Loosen the distributor hold down clamp and rotate the distributor body clockwise as viewed from the top as shown in the next pic, note that the voltage is low, Hall aperture is open. Slowly rotate the distributor body counter clockwise until the Hall voltage signal spikes high, tighten the distibutor hold down bolt, back up the crank and CHECK it again. Repeat fine adjustments until a back up and re-check shows it's perfect. Perfect looks like either/both pics directly above, the pic below is during adjustment. [img]http://reflectionsandshadows.com/cabby/static-btdc-low.jpg[/img] 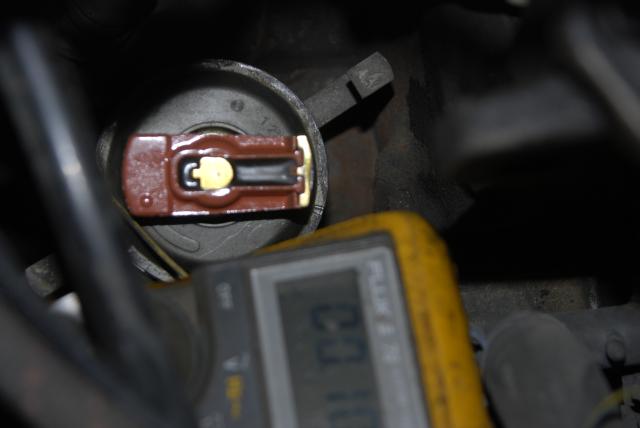 --- Story time..... sorryyyy....... About a month and a half back I had to get my '92 DigiFant I Cabriolet ready for California Smog Testing. Among other routine tasks, I statically set the ignition timing using this exact method. Bentley and Factory specs call for +6° ± 1° adjusting, +6° ± 2° checking. Since I was adjusting for a Smog Tech to check I eyeballed +4° (by visually estimating 2/3rds from the center of the zero mark to the +6° mark) for minimal NOX emissions. smog tech (notice he's gone lower case?) guy did the CTS disconnect, 2,000 RPM, click your heels 3 times book timing check with a degree reading timing light and recorded the timing was set to +4°, then he flunked the car's smog for a relocated oxygen sensor (effer..). Next day, car was at the State of California's Smog Referee station who kindly issued and applied a relocated oxygen sensor approval/exemption sticker good for forever. Along the way, the Official State of CA ref also did the strobe timing dance and recorded that the timing was measured set at +4°. This static method works fine. |